Let me just start out by saying this: I love Pinterest! It's a fantastic site for visually bookmarking your favorite stuff on the web. I'm not a fan of looking through a list of links trying to remember which is the one I'm looking for at the moment. With Pinterest, I'm able to figure out what I want quickly and easily. I have boards for recipes, crochet patterns, blogs, and girly crafts among many others.
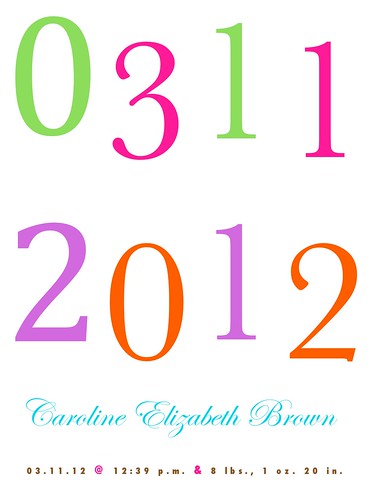
As I was checking the boards about a year ago, I came across a super-cute birthdate print that I would love to have in my girls' room. When I followed the link, it took me to Etsy where it was on sale for $34.00. Unfortunately, I don't have $70.00 to spend on a print for each girl so I decided to try coming up with something similar. The end result might not be quite as attractive (I don't have any fancy software... I just used Word), but I'm really happy with it. Here's what I came up with:
If you're interested in making one for yourself, I think you'll be very surprised at how easily it can be done.
- Open a Word document and create four text boxes. Make them tall and skinny so that the numbers go on top of each other rather than side-by-side. I decided to line up the first and third text boxes and the second and fourth text boxes, but you can do it however it looks good to you.
- Write out the date in the format you'll be using it( I know it sounds crazy, but you won't be entering the numbers in order since they're going on top of each other). Plug the numbers in the corresponding text boxes.
- Center another text box along the bottom of the date you just created for your child's name.
- Center one last text box below the name for the stats. I used size 13 font and expanded it by 6 points. I made the @ and the & a little bigger to help them stand out. Play around until you come up with a look that you like.
- Adjust the fonts and colors to suit your fancy. I chose Bakersville (size 250) for the numbers, Old Script for the name (adjust to make the name fit how you like underneath the date), and Futura (size 13) for the stats at the very bottom.


Love this idea! Thanks for the tutorial.
ReplyDelete